


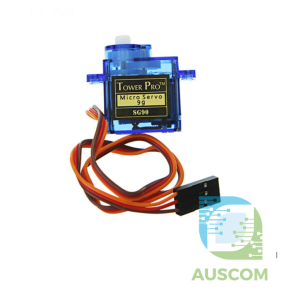
MG90S 9g Digital Servo 90-180° / 360° Top Metal Gear for Arduino RC Plane Robot
Price range: $7.95 through $8.95 Inc. GST
You save
- Description
- Code Examples
- Additional information
- Reviews (0)
Description
⚙️ MG90S 9g Digital Servo 90°-180° / 360° Rotation Top Metal Gear Micro Servo for Arduino RC Plane Car Boat Robot
Overview
The MG90S 9g Digital Servo is a high-performance micro servo motor designed for Arduino projects, RC models, and robotic control.
It delivers precise movement and high torque in a compact size, featuring a reinforced top metal gear for durability and smooth plastic internals for quiet operation.
This servo is available in two rotation versions — 90°–180° for standard angular control and 360° continuous rotation for full rotation applications such as robot wheels and camera mounts.
Perfect for Arduino, ESP32, Raspberry Pi, and other microcontroller systems, it’s ideal for DIY automation, RC aircraft, cars, boats, and robotic arms.
⚙️ Key Features
-
🔹 Two rotation options: 90°–180° (standard) or 360° (continuous)
-
🔹 Designed for Arduino & Microcontroller projects
-
🔹 High torque: 2 kg·cm @ 4.8 V
-
🔹 Fast response: 0.11 s / 60° @ 4.8 V
-
🔹 Top metal gear for strength, internal plastic gears for smooth motion
-
🔹 JR/Futaba-compatible connector
-
🔹 Lightweight 9 g design with included servo horns and screws
📊 Specifications
| Parameter | Description |
|---|---|
| Model | MG90S |
| Rotation Type | 90°-180° Standard / 360° Continuous |
| Weight | 13.6 g |
| Dimensions | 22.8 × 12.2 × 28.5 mm |
| Torque | 2 kg·cm (4.8 V) |
| Speed | 0.11 s / 60° (4.8 V) |
| Operating Voltage | 4.8 V DC |
| Operating Temperature | 0 °C – 55 °C |
| Plug Type | JR / Futaba Universal |
| Gear Material | Top Metal + Internal Plastic |
| Dead Zone | 5 µs |
| Rotation Angle Options | 90°, 180°, or 360° (PWM-dependent) |
| Servo Type | Micro Digital Steering Gear |
| Accessories Included | Servo Horns, Rocker Arms, Mount Screws |
| Compatibility | Arduino, ESP32, Raspberry Pi, STM32, RC Receivers |
🧩 Applications
✅ Arduino and ESP32 robotics
✅ RC planes, cars, and boats
✅ Pan-tilt camera systems
✅ Robotic arms and automation projects
✅ Educational and DIY servo control
📦 Package Includes
-
1 × MG90S 9g Digital Servo (select 90–180° or 360° version)
-
1 × Servo Horn and Rocker Arm Set
-
1 × Mounting Screw Pack
📌 Code Examples – MG90S 9g Digital Servo
🔋 Overview
The MG90S 9g Digital Servo comes in two styles:
🔹 Standard Positional Servo (0–180°)
🔹 Continuous Rotation Servo (360°)
Both work great with Arduino, ESP32, RC projects, and robotics. This section shows how to control each type.
🔌 Wiring (Both Variants)
| Servo Wire | Connects To |
|---|---|
| Red | 5V (Arduino/5V regulator) |
| Brown/Black | GND |
| Orange/Yellow | PWM signal (digital pin) |
⚠ Servos can draw significant current. Use a separate 5V power supply with common ground — do not power directly from Arduino 5V when driving multiple servos or heavy loads.
📌 Part 1 — Standard MG90S Positional Servo (0–180°)
🧪 Arduino Example (Servo Library)
This example sets the servo to 0°, 90°, and 180° in a loop.
📌 What it does:
-
0→ full left -
90→ middle -
180→ full right
⚡ ESP32 Example (Positional Servo)
ESP32 uses ledc PWM channels since standard Servo.h doesn’t work reliably.
📌 Part 2 — Continuous Rotation Servo (360°)
Continuous servos don’t go to a specific angle — they spin in either direction. The “angle” value instead controls:
-
Direction
-
Speed
Typically:
-
~90 → stop
-
<90 → rotate CCW
-
>90 → rotate CW
🧪 Arduino Example
⚡ ESP32 Example (Continuous Servo)
🧠 How to Tell Which Version You Have
| Feature | Positional (0-180) | Continuous (360) |
|---|---|---|
| Moves to specific angle | ✅ | ❌ |
| Spins continuously | ❌ | ✅ |
| Useful for robotics/drive wheels | ⚠ | ✔ |
| Useful for pan/tilt | ✔ | ⚠ |
🧪 Tips & Best Practices
✔ Use a separate 5 V power supply for servos (especially 2+ servos)
✔ Common ground between servo power and MCU
✔ Add a large capacitor (1000 µF+) across servo power for stability
✔ For continuous servos, start with values near 90 until you find your stop point
🎯 Quick Reference
Positional
Continuous
📌 Using MG90S Servos With the PCA9685 16-Channel Driver
📋 Why use the PCA9685?
The PCA9685 gives you:
-
16 channels of perfect 50 Hz servo PWM
-
Zero jitter (hardware timed)
-
Only uses 2 wires from the MCU (I²C)
-
Safe for controlling many servos at once
-
Works with Arduino, ESP32, Raspberry Pi
Perfect for both 0–180° positional servos and 360° continuous rotation servos.
🔌 Wiring – PCA9685 + MG90S + Arduino
🟦 PCA9685 Power & I²C
| PCA9685 Pin | Connect To |
|---|---|
| VCC | 3.3V or 5V (logic power) |
| GND | GND |
| SDA | A4 (Arduino UNO) |
| SCL | A5 (Arduino UNO) |
| V+ | 5V servo power supply |
| GND | Same ground as Arduino |
🔋 Servo Power Reminder
MG90S should not be powered from Arduino 5V.
Use a dedicated 5V 2A+ supply, and share ground with the PCA9685 + Arduino.
📌 Example 1 – 180° Positional Servo With PCA9685 (Arduino)
This example moves the servo to 0°, 90°, 180°.
📌 Example 2 – 360° Continuous Servo With PCA9685 (Arduino)
For 360° continuous rotation:
-
90° = stop
-
>90° = CW
-
<90° = CCW
⚡ ESP32 Example (Positional Servos + PCA9685)
ESP32 works identically — same library and code.
🎯 Recommended Add-Ons (great for cross-selling)
You can add this section at the bottom to help boost conversions:
Works perfectly with:
-
PCA9685 16-Channel Servo Driver Module
-
5V 3A regulated power supply
-
Dupont jumper wires
-
Servo extension leads
-
Metal servo horn upgrade kits
Additional information
| Weight | N/A |
|---|---|
| Dimensions | N/A |
| Degree | 90-180, 360 |
Only logged in customers who have purchased this product may leave a review.



Reviews
There are no reviews yet.