


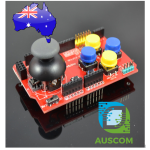
KY-023 Dual-Axis XY Joystick Module PS2 Type for Arduino ESP32 Raspberry Pi

$6.95 Inc. GST
You save
- Description
- Code Examples
- Additional information
- Reviews (0)
Description
🕹️ Arduino Dual-Axis XY Joystick Module PS2 Type Control Lever Sensor (KY-023)
Overview
The KY-023 Dual-Axis Joystick Module is a high-quality PS2-style analog control lever used for precise directional input and button control in Arduino and microcontroller projects.
It provides two analog outputs (X and Y axes) for directional movement and a digital switch output (Z-axis) for button press detection — ideal for robot control, game controllers, and interactive projects.
⚙️ Key Features
-
🔹 Dual-axis analog output (X & Y) for smooth directional input
-
🔹 Built-in push button (Z-axis) for digital on/off signal
-
🔹 Wide voltage range: operates on 3.3 V – 5 V DC
-
🔹 10 kΩ precision potentiometers for accurate analog readings
-
🔹 PS2-style control stick with self-centering spring return
-
🔹 Compatible with Arduino, ESP32, Raspberry Pi, STM32, and other microcontrollers
-
🔹 Easy plug-and-play connection with standard 5-pin header
-
🔹 Perfect for robotics, gaming projects, RC controllers, and DIY interfaces
📊 Specifications
| Parameter | Description |
|---|---|
| Model | KY-023 |
| Type | Dual-Axis Joystick Sensor Module |
| Operating Voltage | 3.3 V – 5 V DC |
| Axes | X, Y (analog), Z (digital push button) |
| Output Type | 2 × Analog + 1 × Digital |
| Resistance | 10 kΩ per axis |
| Interface Pins | +5 V, GND, VRx, VRy, SW |
| Size | ~40 mm × 26 mm × 32 mm |
| Mounting Holes | 2 × M2 holes |
| Material | ABS handle + PCB base |
| Compatibility | Arduino UNO, Mega, Nano, ESP32, Raspberry Pi, STM32 |
| Module Type | KY-023 Dual-Axis Joystick |
🧠 How It Works
The X and Y axes use variable resistors (potentiometers) to output analog voltage levels corresponding to stick movement.
The Z-axis is a simple digital push button that outputs LOW (0) when pressed.
Simply connect the VRx, VRy, and SW pins to your Arduino analog and digital inputs, then read their values for real-time joystick control.
🧩 Applications
✅ Robot control and navigation
✅ Game controller projects
✅ Remote-controlled car or drone systems
✅ Pan-tilt camera control
✅ DIY arcade controllers
✅ Interactive installations
📦 Package Includes
-
1 × KY-023 Dual-Axis XY Joystick Module for Arduino
📌 Code Examples – KY-023 Dual-Axis XY Joystick Module
📋 Overview
The KY-023 Joystick provides:
-
X-axis analog output
-
Y-axis analog output
-
Click button (digital)
It works with Arduino, ESP32, Raspberry Pi, and other microcontrollers and is great for:
✔ Robot control
✔ Menu navigation
✔ Game controllers
✔ Pan/tilt mechanisms
✔ Custom input devices
🔌 Wiring (Arduino / ESP32)
| Joystick Pin | Connect To |
|---|---|
| +5V | 5V (Arduino) / 3.3V (ESP32 OK) |
| GND | GND |
| VRx | A0 (Arduino) / any analog pin on ESP32 |
| VRy | A1 (Arduino) / any analog pin on ESP32 |
| SW | D2 (or any digital pin) |
On ESP32, analog pins can be any ADC-capable pin (e.g., 32, 33, 34, 35).
🧪 Arduino Example – Read XY + Button
What to Expect
-
X and Y read ~center (~512) when at neutral
-
Increase/decrease as joystick moves
-
Button prints “Pressed” when clicked
⚡ ESP32 Example – Read XY + Button
📊 Normalising Values (0–100%)
If you want to map the joystick values to percent (e.g., 0–100%), you can use:
For ESP32 (12-bit ADC):
🧠 Quick Tips
⭐ The joystick returns center values around mid-range
⭐ Button is usually active LOW (pressed = LOW)
⭐ Use INPUT_PULLUP to avoid floating inputs
⭐ On ESP32, ADC values are 0–4095 (12-bit resolution)
🚀 Simple Use Cases
✔ Pan/Tilt control
✔ Robot direction control
✔ Menu navigation UI
✔ Virtual joystick input for games
✔ RC car steering logic
Additional information
| Weight | 40 g |
|---|---|
| Dimensions | 260 × 160 × 20 mm |
Only logged in customers who have purchased this product may leave a review.








Reviews
There are no reviews yet.